Project mayhem 2012

Oct 31, 2012 | comments

" The best way to predict the future is to CREATE IT.  "
What is Project mayhem 2012 ?

On the 10 days that go from 12-12-2012 to 12-21-2012, the world will see an unprecedented amount of Corporate, Financial, Military and State leaks that will have been secretly gathered by millions of CONSCIENTIOUS citizens, vigilantes, whistle blowers and initiates.

The global economic system will start the FINAL FINANCIAL MELTDOWN.

For trust in fear based MONEY WILL BE FINALLY BROKEN.

People all over the world, out of FEAR to go bankrupt, will try to withdraw their savings from their bank accounts this will trigger an EVEN LARGER MELTDOWN WAVE.
--------------------------------------------------------------------------------------------------------------
Imagine the corrupts start to fear us. When the people fear the government, there is tyranny, But when the government fears the people, there is liberty. People shouldn’t fear of their government. Governments should fear their people.

Four billion years of evolutionary success encoded deep within the fabric of every strand of our dna. Four billion years of evolutionary success has brought us here. A turning point for humanity, into a new aeon. An age where light has pierced into darkness illuminating all things.. We are all absolutely FREE! there are no rulers, there are no masters, there is no elite. The time to take control of our reality is now. This is the time to wake up, this is the time to expose all lies, this is the time we ascend from darkness.

Imagine we finally find the COURAGE needed to BECOME THE CHANGE WE WISH TO SEE in the World.
Imagine we conquer Freedom by beginning to be Free.
Imagine we conquer Justice by beginning to do Fair.
Imagine we conquer Truth by beginning to do and be True to ourselves.
Imagine the System is built upon lies.
Imagine we Leak it all.
Imagine we all synchronize our clocks to act at the same Time, on the Winter solstice, the December 21,  2012 at 11:11local time.

We are Anonymous.

We do not forgive.

We do forget.

December 21, 2012, expect us.

You are Project MAYHEM 2012

Security Predictions For 2013-2014

Oct 30, 2012 | comments


There are some major threats that will be most prevalent in 2013- 2014 : cyber security, big data,Mobile malware,cloud-based botnets,data security in the cloud, supply chain security, and consumerization.

Experts believe that, in 2013, anyone whose intellectual property can be used for profit or as a vantage point can become a target of cyber espionage. Governments should seriously start focusing on the protection of critical infrastructure, and they should even prepare for the eventuality of a full telecommunications blackout.

As far as the supply chain is concerned, a large number of organizations have been affected by malicious operations that targeted their suppliers. Such incidents will likely continue and more companies will become victims.
Big Data has a lot of advantages, but the security risks that come with this concept are great. The biggest challenge for companies in 2013 will be to secure not only the data inputs, but also the Big Data outputs.
 
Many businesses have started to realize the importance of data security in the cloud and have begun implementing security and compliance strategies. However, most of them are still a long way from achieving this goal, mainly because they still don’t know in which areas they’ve implemented cloud services.
Finally, the bring your own device (BYOD) trend should be a major concern for most organizations. It’s easy for employees to lose the boundary between work and personal data, and this could lead to accidental disclosure of sensitive information.
Also, since sharing location via GPS-enabled devices has become so popular, crimes that exploit such information will become more common.
 
"Organizations must prepare for the unpredictable so they have the resilience to withstand unforeseen, high impact events"

In 2014 :  Cybercriminals will remotely commit a murder by tampering with electronic devices that are connected to the Internet. A vivid example is that of an Internet-connected car of which the onboard software is hacked to alter its control systems (brakes come to mind). Basically, anything electronic and Internet-connected could be remotely controlled/ reconfigured with potentially disastrous, physical, consequences (depending on the device and the circumstances). Because of the remote nature of the interaction, it will be very difficult to catch the perpetrator .

Leveraging of Mobile Device :   In order to steal money through banking and e-commerce applications. As more and more smartphones will come equipped with NFC to enable mobile payments or the exchange of information between devices, cybercriminals are likely to focus on the relatively poorly secured applications that are meant to interface with NFC.

            More malware driven cyber-espionage and sabotage between nation states (think Stuxnet, Flame, Duqu and others), the compromising of critical infrastructure resulting in severe damage and the exploiting of military assault systems (think hacking an armed drone), possibly resulting in the loss of lives and/or the destruction of property. 

And Beyond

The “cloud” will become more intelligent, not just a place to store data. Cloud intelligence will evolve into becoming an active resource in our daily lives, providing analysis and contextual advice. Virtual agents could, for example, design your family’s weekly menu based on everyone’s health profiles, fitness goals, and taste preferences, predict futurist consultants Chris Carbone and Kristin Nauth.

Robots will become gentler caregivers in the next 10 years. Lifting and transferring frail patients may be easier for robots than for human caregivers, but their strong arms typically lack sensitivity. Japanese researchers are improving the functionality of the RIBA II (Robot for Interactive Body Assistance), lining its arms and chest with sensors so it can lift its patients more gently.

Neuroscientists may soon be able to predict what you’ll do before you do it. The intention to do something, such as grasp a cup, produces blood flow to specific areas of the brain, so studying blood-flow patterns through neuroimaging could give researchers a better idea of what people have in mind. One potential application is improved prosthetic devices that respond to signals from the brain more like actual limbs do.
 

How to set up a Web server

| comments

Web Server


Hardware Setup

You'll need some hardware, and fortunately, a personal Web server doesn't require a lot of juice. You can cobble together a server out of spare parts and it will almost certainly be enough to do the job. If you're starting from scratch, consider something like an E-350-powered Foxconn NTA350. Coupled with 4GB of RAM and a 64GB SSD, you can get rolling for about $270. There are cheaper options, too, but I used just such a setup for more than a year and I can attest to its suitability.
If you're cannibalizing or cobbling, you really don't need much. We're going to be using a Linux server distro as our server operating system, so the hardware can be minimal. An old Core 2 Duo or Pentium box gathering dust in the corner should work fine. You don't need more than 1GB of RAM, and in fact 512MB would work without issue. Ten gigabytes of storage is more than you'll ever fill unless you're going to use the server for lots of other stuff as well, so a creaky old hard drive is fine. As long as you can install your Linux distro of choice on it, it will work without issue.

Don't Have Hardware Available Fear Not Setup With a Virtual Machine :


If you don't have hardware available or you don't want yet another computer clogging up your closet, fear not. For home use, a virtual machine works perfectly well. In fact, a VM is exactly what you'd be issued if you go with just about any hosting provider on the planet, unless you pony up some serious dollars to have your own dedicated server. Having your own physical machine is nice, but it's not always practical. Feel free to follow along at home inside a VM.
If you don't already own a desktop virtualization product of some sort (VMware Workstation for Windows, or VMware Fusion or Parallels for OS X), there are free alternatives: VMware VSphere is full-featured and rich, but it requires you to dedicate an entire computer as a virtualization host. The company's older standalone product, VMware Server, is still available but rapidly approaching its end-of-life for support. Windows 8 and Windows Server 2012 come with a built-in hypervisor, but you need to purchase the operating systems. There's also a standalone product, Hyper-V Server, but like VSphere it requires you to dedicate a whole computer to virtualization.
The least-complex, free solution is to download and install VirtualBox. That will run on an existing Windows or OS X or Linux host and will let you run a virtualized Linux server with a minimum of fuss. I won't go through the steps of downloading and installing a virtualization solution, but it's not terribly hard.

Operating System

 I've already given away the operating system choice a couple of times: the correct operating system for building a Web server is Linux or BSD. It's as simple as that. Windows Server is the correct tool for many things (particularly with Active Directory, which frankly is peerless for managing accounts, objects, and policies—OpenDirectory and other competitors are just laughably bad at scale) but building a Windows-based Web server is like bringing a blunt butter knife to a gunfight. The Internet and the services that make it run are fundamentally Unix-grown and Unix-oriented. Playing in this playground means you need a Linux or a BSD server .

So, Linux or BSD? That choice is probably an entire article in and of itself, but I'll keep it short: I'll be talking about using a Linux distro (that is, a Unix-style operating system composed of the Linux kernel and a curated collection of tools and packages) instead of a BSD variant (that is, a Unix-style operating system composed of a unified base system and tools and packages). There are a number of reasons for choosing to go with a Linux distro over a BSD variant but the most relevant factor is that Linux distros will be easier to install because of broader, better hardware support.

Quick OS Install

Whether you go physical or virtual, getting your Linux server stood up and ready to transform into a Web server is easy. Accept all of the standard Ubuntu installation options (or change the ones you feel you need to change) until you get to the "Software Selection" page. There's an option here titled "LAMP server," which will have Ubuntu automatically download and configure Apache, PHP, and MySQL. This is a great way to have a ready-made Web server, but we're not going to use this option because we're not going to use Apache.
Instead, simply select "OpenSSH server" from the list and nothing else. This will get us set up for easy remote administration. Why aren't we choosing to install Apache? Read on!

Web Server


Our chosen OS is installed, and so what shall we pick for our Web server? There are two main choices: Apache, the flexible and powerful open-source Web server which powers the vast majority of sites on the Internet, or Nginx (pronounced "engine-ex"), the not-as-flexible but far more powerful open-source Web server which runs the second-largest chunk of sites on the Internet (IIS dropped to third place behind Nginx in 2012).The Web server we're going to select here is Nginx.
Why Nginx over Apache? Again, such a comparison could warrant an entire article, but Nginx will typically be faster than Apache in servicing requests and will use fewer resources when doing so. The most common version of Apache is called Apache MPM prefork, which trades speed for greater compatibility with the galaxy of Apache add-on modules that have grown up over the years. Apache prefork is non-threaded, handling Web requests with whole processes instead of spinning off threads as needed; under sufficient load, Apache prefork can use tremendous amounts of RAM and can become extremely inefficient at handling IO. There are other versions of Apache available, like MPM worker and MPM event, both of which use more efficient methods to service IO requests, but neither is as successful at doing so as Nginx.
Nginx is an entirely event-driven asynchronous Web server, originally designed and written by a Russian dev team to power some very large Russian websites. Unlike Apache prefork, where each HTTP connection to the Web server is handled by a separate process, Nginx uses a small number of single-threaded worker processes to grab the next bit of IO activity without regard to HTTP connection count. It's also important to note that Nginx doesn't utilize a thread pool—individual HTTP connections don't get assigned their own threads. Rather, each Nginx worker process runs in a tight and efficient event handling loop, watching a listen socket and grabbing the next discrete task presented on that socket. Process- or thread-based architectures like Apache prefork can spend large amounts of time with their processes or threads sitting idle, waiting for operations to complete, because the entire operating is assigned to that process or thread. Nginx's worker processes, by contrast, will busy themselves handling other tiny events until the slow request is complete, then pick up its results and deliver it.
Nginx lacks Apache's truly gargantuan ecosystem of add-on modules, but its efficiency and speed can't be beat. Chris Lea put it most succinctly when he said, "Apache is like Microsoft Word, it has a million options but you only need six. Nginx does those six things, and it does five of them 50 times faster than Apache."


Logging In

We installed the "SSH server" option in order to make it easy to log into your server from your desktop. If you're using a virtual machine hosted on your main computer then it doesn't make much of a difference but if you're using physical hardware, you can leave the computer in the closet and do the rest of this from your desk and comfy chair. To log in to your server via ssh, open a terminal window and type ssh yourname@server, substituting your user account for "yourname" and the server's name or IP address for "server." Windows users who don't have a native ssh client can use PuTTY; alternately, you can install cygwin and bring a small slice of sanity to your computing environment.


Installing Nginx

The version of Nginx available in Ubuntu 12.04's repositories is outdated, so we'll need to add a repository to Ubuntu in order to get the latest version. To do that, we need to install the add-apt-repository tool. Now that you're logged onto your Ubuntu server or virtual machine, spawn a root-privileged shell by typing the following:
sudo /bin/bash
You'll notice the prompt change from a "$" to a "#", indicating that your commands will be executed with root privilege instead of as a standard user:

Then type the following two commands:
aptitude update
aptitude install python-software-properties
The first command will run out and touch all of the repositories Ubuntu is currently configured to use and check for any updated software, and the second will install the add-apt-repository command.

After it runs, it's probably also a good idea to let aptitude run a regular update, too, since lots of the default installed Ubuntu packages probably have updates:
aptitude upgrade
(As a quick aside, I'm using aptitude instead of the more common apt-get, and so should you. The aptitude command is installed by default in Ubuntu Server. It's just plain better.)
Once you've installed add-apt-repository, we need to use it to add the Nginx repository to Ubuntu's sources list so that we can install the current version of Nginx from it:
add-apt-repository ppa:nginx/development
Then, update your aptitude sources list and install Nginx!
aptitude update
aptitude install nginx
 

Basic Tuning

 
If all you want to do is serve some static pages to your LAN, you can probably stop here. Nginx is up with a basic configuration in place and all of your website's files are located in /usr/share/nginx/html. You can edit the default index.html file or drop your own stuff in there and it will be instantly visible.
However, the base configuration really does need some modification in order to be tuned for your environment, and there are also a number of security tweaks we need to make, both to Nginx and to the server itself. To get started on configuring things, head to /etc/nginx and take a look at the files and directories there in.

Your Website

Now let's look at the actual website settings. The default website's settings are stored in a file named, appropriately enough, default. It's probably a good idea to change this and leave the default file for reference, so let's take care of that right now.
Your Nginx install can support far more than a single website and the files that define your server's sites live in the /etc/nginx/sites-available directory. However, the files in this directory aren't "live"—you can have as many site definition files in here as you want but Nginx won't actually do anything with them unless they're symlinked into the /etc/nginx/sites-enabled directory (you could also copy them there, but symlinking ensures there's only one copy of each file to keep track of). This gives you a method to quickly put websites online and take them offline without having to actually delete any files—when you're ready for a site to go online, symlink it into sites-enabled and restart Nginx.
These files are called "virtual host" files, the same as they are in Apache, because each of them defines a website that acts as if it were running on its own server (or host). To start with, we're going create a copy of the default site and then customize it, so head to the sites-available directory. It's a common practice to have each virtual host file named the same as the website it represents; for now, because this will be our only website, we can simply name the default file to "www" (though you can call it whatever you'd like).
cd /etc/nginx/sites-available
cp default www
Next, we need to activate our www virtual host file, which is done by creating a symbolic link for it in the sites-enabled directory. At the same time, we're going to deactivate the default virtual host by deleting its symbolic link:
cd /etc/nginx/sites-enabled
rm default
ln -s /etc/nginx/sites-available/www /etc/nginx/sites-enabled/www
If you check the contents of the sites-enabled directory, you should see only the www symbolic link, which points back to its original location in sites-available.
Finally, tell Nginx to reload its configuration files to enact the changes you've made. This must be done after changing any configuration files, including nginx.conf like we did above. The command to reload Nginx is:
/etc/init.d/nginx reload
Now that we've stashed the default file for safekeeping and switched to using the www virtual host file instead, let's take a look inside it

The "server" declaration indicates this file defines a specific virtual host. The root directive indicates the actual path on your hard drive where this virtual host's assets (HTML, images, CSS, and so on) are located, and here it's set to /usr/share/nginx/html. If you'd rather use a different location, you can add that here. The index directive tells Nginx what file or files to serve when it's asked to display a directory. Here, Nginx is told to first try to show that directory's index.html file, and if that file doesn't exist, try instead to show index.htm. You can add additional files here, too, like index.php if your site is using PHP. If none of the files listed are found, Nginx will either reply with a listing of all the files in that directory (if configured to do so) or with an error.
The server_name directive is a key setting. When you have multiple virtual hosts running on one server, server_name is how Nginx knows which site to serve up. If you had your www virtual host file and another virtual host file named, say, forum (because maybe you're hosting a Web forum), you could set the www virtual host as the virtual host that gets loaded when users request www.yoursite.com and the forum virtual host as the one that gets served when a user requests forum.yoursite.com, with Nginx keying off of the server name in the requested URL. For now, we can leave this alone.
Below this are "locations," which are the things your users are going to be interested in accessing. Defining locations gives you a way to apply different settings to different paths on the server. Right now, there are two locations: one at "/", called the "root location," and one at /doc/, which points at /usr/share/doc.

That useless location is now gone, so take a look back at the root location. The only directive it contains is a try_files directive, which tells Nginx what to do for every incoming requests. As configured, the directive says that Nginx should take each incoming request and try to match it to a file with that exact name. If it doesn't find anything to then try to match it to a directory with that name, this directive tells it to finally just serve up the index page in response. So, a request to http://yourserver/blah would first check to see if the root location contained a file named "blah." If it didn't, it would then see if the root location contained a directory named "blah/", and if it didn't, it would then just redirect the user back to the index file. Go ahead and try it—tag a nonexistent file or directory name onto the end of your browser's URL bar and watch your Web server reply with its front root index page.

Meeting The Big Bad Internet


Your Web server works great at this point, but it's not reachable from outside your LAN—exposing it to the Internet will require you to do some configuration on your NAT router and/or your LAN's firewall.
However, you need to carefully consider what you want to expose. To actually let folks outside your LAN use your Web server requires only a single opening—if you have a NAT router, like most home users, you need to forward TCP port 80 to your Web server. Some ISPs block port incoming requests on TCP port 80 for their residential customers; if that's the case for you, pick another high-order port, like 8080 or 8088, and forward that to TCP port 80 on your Web server.
Don't forward any ports you don't have a reason to forward. It might be tempting to use the "DMZ host" function in your NAT router to open all of its ports to the Internet, but this is a terrible idea. It robs your host of much of the protection from attack it gains by being behind a NAT router.
There are a couple of additional ports you might consider opening up besides TCP port 80. If you're going to use SSL/TLS encryption for serving things via HTTPS, you should also forward TCP port 443 to your Web server. If you want to be able to connect via ssh from the Internet, you should forward TCP port 22. However, if you're going to do this, make sure to take the appropriate precautions (which we'll get to in just a moment).

Safety And Security

So far we've focused on getting you up and running, and now that's done. Having a functional Web server is one thing; now we need to secure it.
Most of the intrusions and security breaches that happen on Web servers don't come from vulnerabilities in the Web server but rather from flaws in the add-on software. So far, the only thing we have installed is Nginx itself. Assuming that only port 80 is exposed through your firewall to the Internet, there just aren't that many things a potential attacker can latch onto and break. However, there are several adjustments we can make in the configuration file and in the virtual host files to harden the site.
The first setting will stop Nginx from sending identifying information when it serves up error pages. By default, Nginx will include its version number on error pages. Hiding this gives potential attackers less information about your server.

You may already have a keepalive_timeout setting; if so, replace it with this one. Each of these settings will alter a default bit of Nginx's behavior in order to make the site less vulnerable to distributed denial of service attacks. Client_max_body_size limits the maximum size of an uploaded file; client_header_timeout and client_body_timeout set the maximum amount of time Nginx will wait around on the client to specify a request header or ask for an object to be served; keepalive_timeout specifies that Nginx should hold open a keep-alive connection for no more than 10 seconds and also suggests to the client that it should close its connections after the same interval; and send_timeout tells Nginx to close its connection to a client if that client takes too long between successive requests.
These settings will limit the amount of resources Nginx spends responding to slow requests, so that it's considerably more difficult for an attacker to tie up the server's resources. Nginx's architecture makes it less vulnerable to this kind of denial of service attack than other Web servers, but it's perfectly possible to exhaust Nginx's resources with enough attacking machines. This will help mitigate that risk. The settings here should more than suffice for a personal site, though they can be tweaked as needed.
The virtual host files in /etc/nginx/sites-available/ need a bit of love, too. Even if you're planning on opening your Web server up to the Internet, you might want to keep some or all of a site only accessible on your LAN while you're testing. You can use Nginx's location directives to limit access.
Open /etc/nginx/sites-available/www for editing and locate the root location directive.To lock this down so that the entire site is visible only on your LAN and not over the Internet, modify it .
If you're using something other than 192.168.1.0/24 for your LAN, then replace the netblock after the first allow with your LAN's IP address range. These allow and deny directives ensure that any request from non-LAN and non-local IP addresses for anything on the server will be denied.
You can lock down individual directories or files, too—if you had a subdirectory called personal which you only wanted to be visible on your LAN, you could create a location directive just for that directory.

Locations inherit properties from their parents, though, so the settings you apply to the root location affect all locations beneath it. However, if you wanted just the personal directory to be LAN-only, this is how you'd do it.
Locations are very powerful and flexible in Nginx because you don't have to specify them explicitly—rather, Nginx lets you use regular expressions to define locations, which gives you a huge amount of configurability. A location doesn't have to be a directory or a file—anything that matches a regex can be a location. For example, if you are editing files in your Web root, your text editor might be keeping its temporary files in the Web root, and Nginx will happily serve those files up when asked unless it's told it shouldn't. Temporary files usually start with a dot or a dollar-sign, and so you can create the following two locations to make sure that Nginx never serves any files starting with either of those characters .

This also ensures that attempts to access them aren't logged in Nginx's main and error log files.
There are a lot of location-based tweaks you can apply to your site, but these should give you a good basis for getting started.

Stepping Out: Secure Remote Access

 The last thing we're going to cover is secure remote administration. There is great value in being able to ssh into your Web server from outside of your LAN, but it also carries with it some danger, since exposing your ssh port gives potential attackers a well-known hole to go after. However, there are many things you can do to leave ssh open for your use and at the same time minimize risk.

Key Based Authentication

Using key-based authentication for ssh means that an attacker needs more than just your username and password to log onto your server via ssh—he also needs a special cryptographic key. Linux and OS X can directly generate the needed keys. However, Windows users are again hobbled by their platform's lack of appropriate tools and will need to use a third-party utility like puttygen, or borrow a Linux or OS X machine temporarily.
Key-based authentication can greatly enhance a system's security, though it's certainly not fool-proof. It's not immune to man-in-the-middle attacks and more significantly, if someone steals the computer containing the private key, they gain the ability to log on as you unless you've protected your private key with a password. In general, ssh key authentication is more secure than just using a password, but you'll be most secure by protecting your key with a passphrase.
The Ubuntu documentation site has an excellent and easy-to-follow HOWTO on enabling key-based authentication right here.


No Remote Root Logon


Whether you're using key-based logons or sticking with regular passwords, you should carefully limit which accounts are allowed to log in via ssh. An exposed ssh port will rack up hundreds (if not thousands) of logon attempts in a given day from folks eager to kick down your virtual door, and most of those attempts will use common account names—like "root." Fortunately, the ssh server process can be instructed to allow logons from only certain accounts.
It's a good idea to embrace this functionality and to only allow one or two accounts the ability to log on via ssh. Further, "root" should not be on the list! If you need to do something with root privilege you should either use sudo to execute single commands, or do as we've been doing in this guide and use sudo /bin/bash to launch a new shell as the root user if you're going to be doing a lot of things that need privilege.

Wrap That Rascal

Even disallowing certain usernames might not protect you from brute force attacks, where an attacker spams ssh with a huge number of username and password combinations to try to gain access. You need to also implement a method to limit the number of remote logon tries a user is allowed to make. There are popular methods to do this: via an automated and configurable TCP wrapper like DenyHosts, or by using the built-in iptables firewall to drop all traffic from a given IP address if it makes too many connection attempts in a short amount of time.
Both methods have their advantages. Iptables is arguably more difficult to configure, while DenyHosts uses more resources and can sometimes lag a bit in keeping up with rapid attacks. I've written long blog articles about setting up both solutions; rather than bloat this feature further, you can go here for full instructions on making DenyHosts work or here for instructions on getting iptables working. My recommendation is to try DenyHosts first, especially if you don't have much experience using iptables. However, iptables is far more robust and is the better solution if you don't mind a bit more pain in setting it up.

Web served!

After all of this, you'll end up with a fast, reasonably secure Web server running Nginx, capable of serving out static HTML pages. The setup described herein is perfect for hosting a personal site but what it can't do is host any dynamic content—we haven't yet installed PHP, or a database, or anything else that'll get you doing fancy-pants Web stuff.
That's OK, though. We'll get to all those things and more shortly.


dSploit:Penetration Testing ToolKit For Android

Oct 15, 2012 | comments

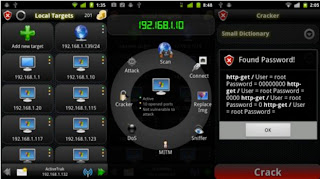
A while back i wrote an article about Anti an android Pen-testing toolkit, Today i came across a wonderful Tool Dsploit Which is more powerful and has more features than Anti, The best part about Dsploit is its open source (i.e) free, unlike anti which has some Premium Restrictions.


Mobile devices have accelerated productivity as they move to replace many of the other devices we used to carry in a small package. Most phones have Wi-Fi capability, cameras, mass storage capability and a persistent internet connection via 3G and 4G and allow a wide number of applications and if rooted provide many of the same tools as a computer, but with more hardware and network capabilities. These conveniences also carry over to make them an very powerful tool to use in penetration tests, more powerful I would argue than a laptop, as a mobile device can be easily hidden on your person, or inside of an office building.

dSploit contains a number of powerful functions that allow you to analyze, capture, and manipulate network transactions. You can scan networks for connected devices, identify the operating system, running services and open ports on each device, as well as checking them for vulnerabilities.
You can also use dSploit to perform so-called “man in the middle’ operations. This is where the ‘fun’ comes. You can use it to intercept traffic from a network-attached computer, and mess with it in a number of ways. For example you can cause havoc with friends or family by replacing all images that appear on every web page on a computer with an image you specify. You can also completely block all internet traffic on the computer. There are a number of other tools such as password sniffers and login crackers, which of course should never be used for anything malicious.


Features :
  • RouterPWN  - Launch the http://routerpwn.com/ service to pwn your router.
  • Trace - Perform a traceroute on target.
  • Port Scanner - A syn port scanner to find quickly open ports on a single target.
  • Inspector - Performs target operating system and services deep detection, slower than syn port scanner but more accurate.
  • Vulnerability -  FinderSearch for known vulnerabilities for target running services upon National Vulnerability Database.
  • Login CrackerA -  very fast network logon cracker which supports many different services.
  • Packet ForgerCraft -  and send a custom TCP or UDP packet to the target.
  • MITM - A set of man-in-the-midtle tools to command&conquer the whole network.
  • Simple Sniff - Only redirects target's traffic through the device ( useful when using a network sniffer like 'Sharp' for Android ) and shows network stats.
  • Password Sniffer - Sniff passwords of many protocols such as http, ftp, imap, imaps, irc, msn, etc from the target.
  • Session Hijacker - Listen for cookies on the network and hijack sessions.
  • Kill Connections - Kill connections preventing the target to reach any website or server.
  • Redirect - Redirect all the http traffic to another adtress.
  • Replace Images - Replace all images on webpages with the specified one.
  • Replace Videos - Replace all youtube videos on webpages with the specified one.
  • Script Injection - Inject a javascript in every visited webpage.
  • Custom Filter - Replace custom text on webpages with the specified one.

 Requirements :
  • An Android device with at least the 2.3 ( Gingerbread ) version of the OS.
  • The device must be rooted
  • The device must have a BusyBox full install, this means with every utility installed ( not the partial installation).


                                  Download dSploit


Anti : Zantiapp's Android-Based Network Penetration Suite

Oct 10, 2012 | comments

Anti: Zantiapp's Android-Based Network Penetration Suite
Anti (Android Network Toolkit) is an amazing android application. You could bring all the Penetration testing tools to your Android smartphone. Using this app is as simple as pushing a few buttons, and then you can penetrate your target.Using Anti is very intuitive - on each run, Anti will map your network, scan for active devices and vulnerabilities, and will display the information accordingly: Green led signals an 'Active device', Yellow led signals "Available ports", and Red led signals "Vulnerability found". Also, each device will have an icon representing the type of the device. When finished scanning, Anti will produce an automatic report specifying which vulnerabilities you have or bad practices used, and how to fix each one of them.

Features :

Scan - This will scan the selected target for open ports and vulnerabilities, also allowing the user to select a specific scanning script for a more advanced/targeted scan.

Spy -
This will 'sniff' images transferred to/from the selected device and display them on your phone in a nice gallery layout. If you choose a network subnet/range as target, then all images transferred on that network - for all connected devices - will be shown. Another feature of the Spy plugin is to sniff URLs (web sites) and non-secured (ie, not HTTPS) username/passwords logins, shown on the bottom drawer.

D.O.S -
This will cause a Denial Of Service (D.O.S) for the selected target, ie. it will deny them any further access to the internet until you exit the attack.

Replace images -
This will replace all images transferred to/from the target with an Anti logo, thus preventing from attacked used seeing any images on their browsers while the browse the Internet, except for a nice looking Anti logo...

M.I.T.M -
The Man In The Middle attack (M.I.T.M) is an advanced attack used mainly in combination with other attack. It allows invoking specific filters to manipulate the network data. Users can also add their own mitm filters to create more mitm attacks.

Attack -
This will initiate a vulnerability attack using our Cloud service against a specific target. Once executed successfully, it will allow the attack to control the device remotely from your phone.

Report -
This will generate a vulnerability report with findings, recommendations and tips on how to fix found vulnerabilities or bad practices used.


                                                  Download Anti


Beware Of Card Trapping at the ATM

Oct 1, 2012 | comments

Many security-savvy readers of indiatriks have learned to be vigilant against ATM card skimmers and hidden devices that can record you entering your PIN at the cash machine. But experts say an increasing form of ATM fraud involves the use of simple devices capable of snatching cash and ATM cards from unsuspected users.

Security experts with the European ATM Security Team (EAST) say five countries in the region this year have reported card trapping incidents. Such attacks involve devices that fit over the card acceptance slot and include a razor-edged spring trap that prevents the customer’s card from being ejected from the ATM when the transaction is completed.
Spring traps are still being widely used,” EAST wrote in its most recently European Fraud Update. “Once the card has been inserted, these prevent the card being returned to the customer and also stop the ATM from retracting it. According to reports from one country – despite warning messages that appear on the ATM screen or are displayed on the ATM fascia – customers are still not reporting when their cards are captured, leading to substantial losses from ATM or point-of-sale
transactions.”

According to EAST, most card trapping incidents take place outside normal banking hours with initial fraudulent usage taking place within 10 minutes of the card capture (balance inquiry and cash withdrawal at a nearby ATM), followed by point-of-sale transactions.

 
Support : INDIATRIKS
Copyright © 2011. INDIATRIKS - All Rights Reserved
Template Edited By Indiatriks
Proudly Powered By Blogger